If you're not interested in the background of the issue and its fix, you can go straight to the updated technical note on how to fix the leak here.
It all started when I decided to transition from my old trusty M2 to the M5. I loved the classic design of the M rangefinder, but once I had the chance to hold a friend's M5, I knew I had to have one. If you want to know in detail why the M5 is a great camera, you can check out my manifesto at this link.
I ended up acquiring a two-lug version and loved it from the beginning. Everything felt just in place in this camera, especially considering my relatively big hands. Unfortunately, though, from the very first roll, I noticed something odd—a weird, triangle-shaped leak in a few of my frames, always in the bottom left corner.
It didn’t bother me much since it wasn’t that frequent, and I wasn’t using the camera as a professional tool, but since it was under warranty, I sent it back to get it fixed. The camera came back to me after a while, and two rolls later, there it was again. I searched the web and noticed that a few other M5 users had the exact same problem, and as far as I could tell, pretty much no one had solved it.
Coincidence or not, around that same time, I was offered a truly mint-condition, later-production M5 (higher serial number, three-lug version), and I thought that was the end of my problems. I returned the older one for good, and as soon as I got my hands on the new one, I was mesmerized. It was aesthetically perfect—not a single scratch. I thought this might be the camera I would stick with, but, as you might have guessed, by the third or fourth roll, there it was again.

I was outraged. How was this possible? I couldn’t believe it. But this time, I couldn’t simply send it back—I had to figure it out. It was just a simple light leak, after all. It couldn’t be that hard. Or at least, that’s what I thought.
I started searching everywhere on the web for answers—every forum and group imaginable, even in different languages: English, Japanese, German... All I could find were people complaining about the same issue, saying they were going to send it to "their guy" to get it fixed. Every single one of them replied on the same posts months later, basically saying "They couldn’t fix it." I was hopeless.
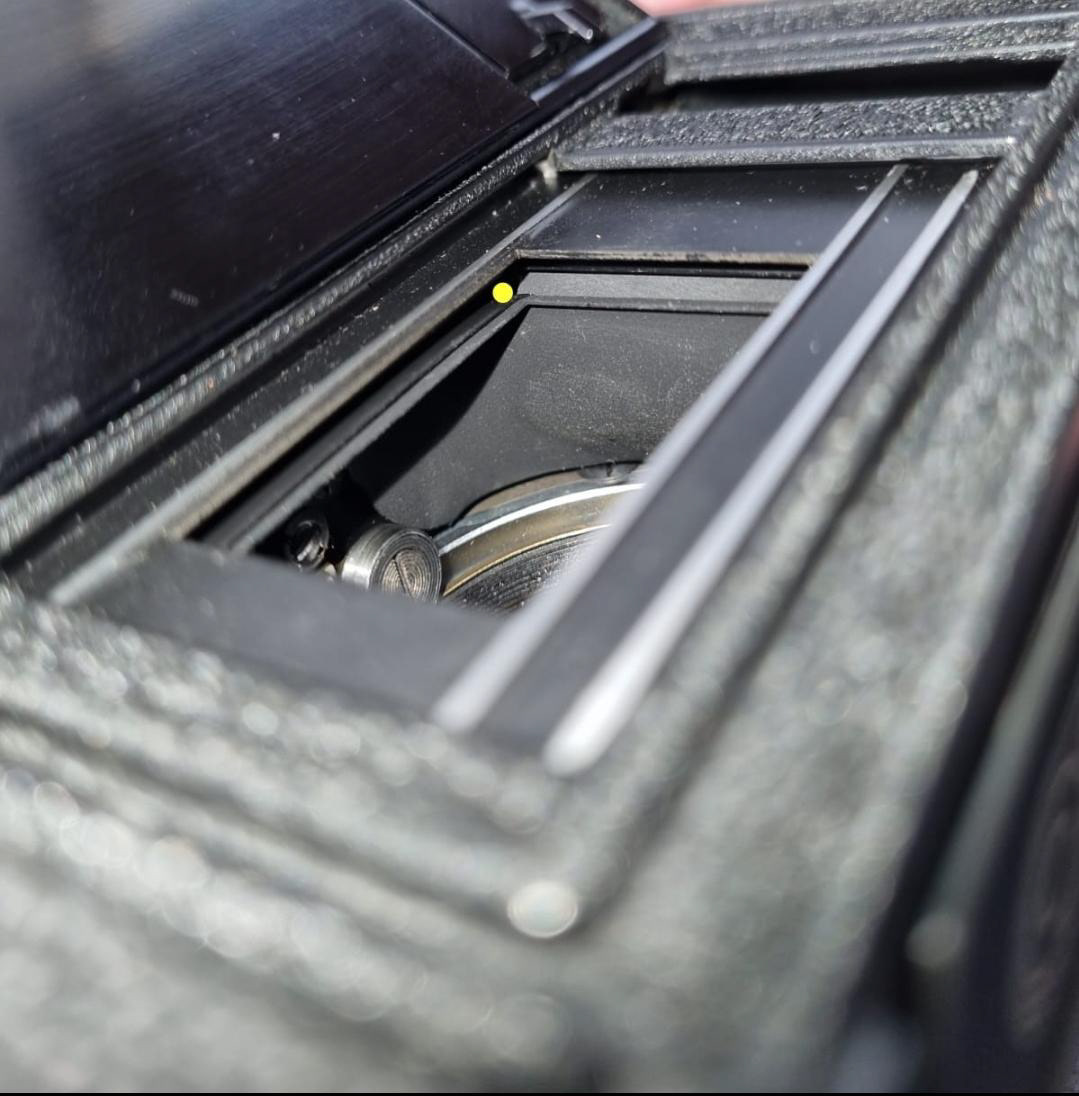
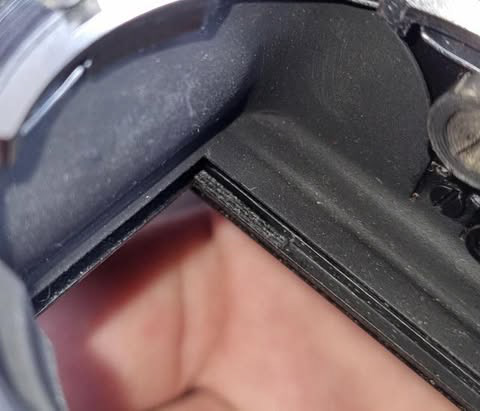
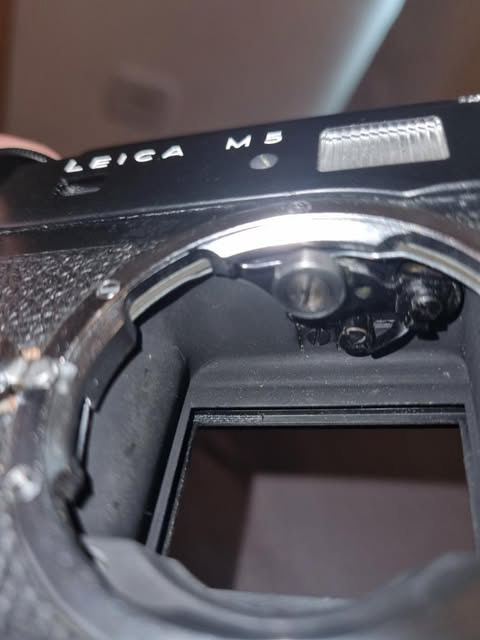
I tried inspecting the camera and the leak more carefully myself, and after a long time, the only thing I could determine for sure was that the leak was coming from the small rangefinder window, from a very specific angle. If you’re in a completely dark environment, shine your phone’s flashlight into the window and, with the back of the camera open, look into the void between both walls. With a bit of patience, you might be able to see a tiny source of light coming through—approximately here:
But everything changed when I found a post about it on a French forum. One of the users claimed this problem had been chronic to the M5 body since the beginning—and that it had been acknowledged by one of Leica’s technicians back in the 70s. If that wasn’t enough, he even said he had an official repair guide issued in 1975 by the technician himself, detailing how to fix the leak for good. Here’s what it said:
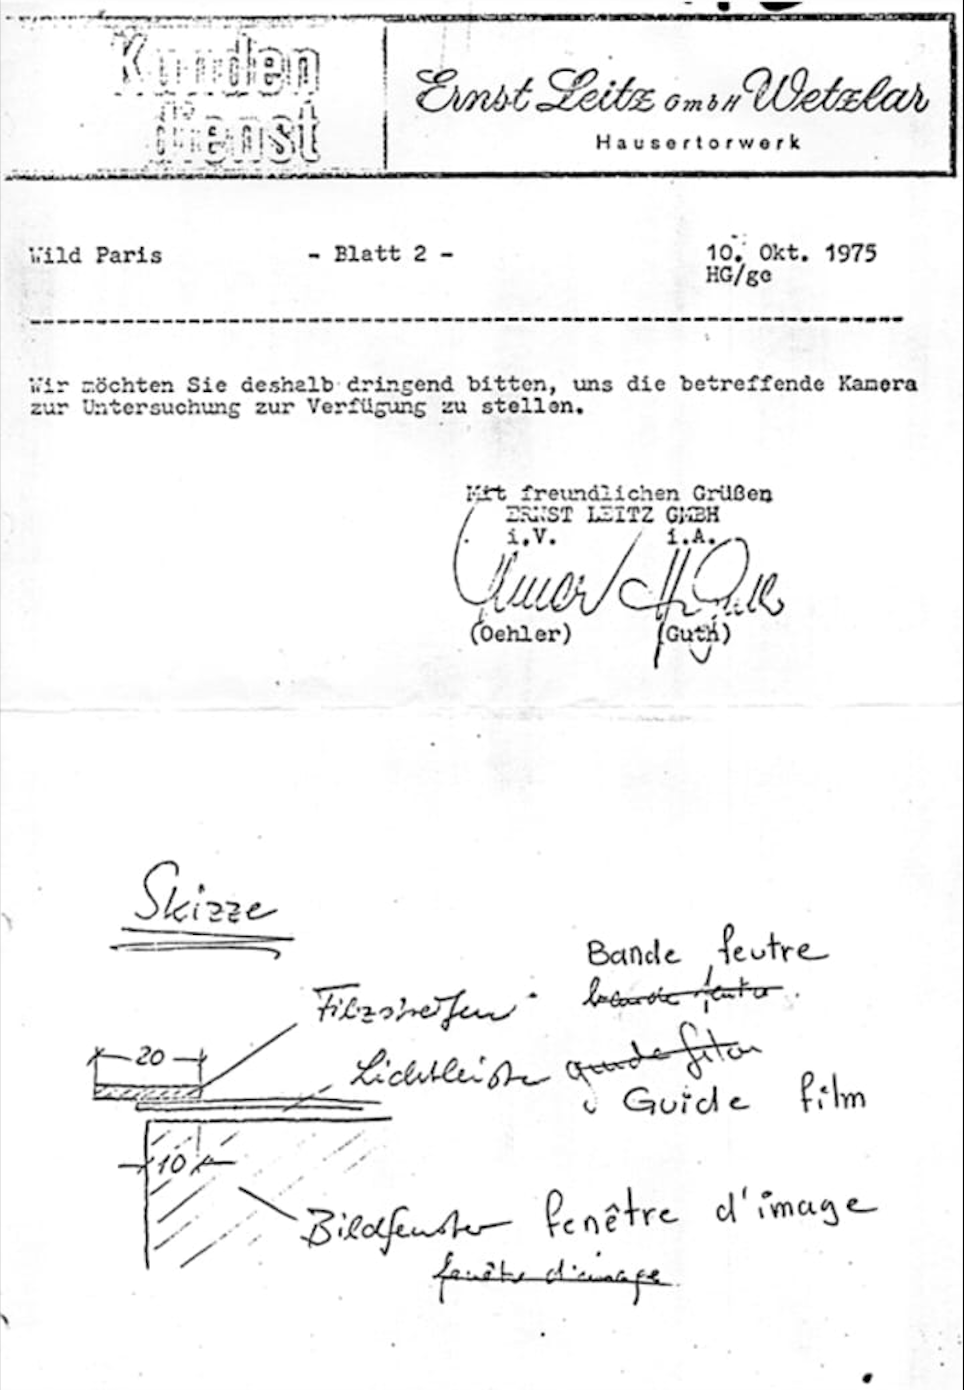

The translation in English would be something like this:
"We thank you for your letter dated 08/25/1975. Unfortunately, we can only respond today.
Based on the negatives sent, we were able to locate the light leak in the LEICA M5. It is caused by light entering through the small rangefinder window.
You can confirm this by completely covering the small rangefinder window and placing the loaded camera in a strong light source.
To avoid this issue, we advise cutting a 20mm piece of the small felt strip 42.253.01.904, which is glued inside the LEICA M case, and flattening it with a hammer.
This felt strip should be glued inside the main chassis with EC 880 glue on the film guide light path so that, when looking at the camera from the lens side, the strip rests evenly on the edge of the image window (see diagram).
This method has the advantage that the camera does not need to be disassembled. However, it must be done with great precision; otherwise, the shutter could be damaged.
If necessary, the felt strip should be pressed, with the shutter open, using a small metal plate and should not extend beyond the film guide.
We will soon provide corresponding instructions.
The light leak in the LEICAFLEX SL is rare and does not correspond to defects of this kind that have been observed so far.
We kindly ask you to make this camera available to us as soon as possible for examination."
Great, right? Problem solved. Well, not so fast. If we could simply follow the instructions and fix the leak, it would be amazing since it looks fairly simple.
After carefully examining the note, I must admit that I didn’t understand a single thing. The wording is quite strange, and the sketch is terrible.
I spoke to a friend of mine who speaks French, and he assured me that the German technician who issued this document didn’t speak good French at all. I even asked some engineer friends to try to interpret the drawings, and—once again—nothing. I tried everything, spending hours looking into the camera, trying to figure out where the "felt strip" should go.
That went on for a few days until, finally, I could say I had figured it out. Trust me, I dedicated much more time to understanding this than you can imagine, and I can confidently say that this is the only possible explanation for the technical note. This method is fully in accordance with the original note, based on my interpretation. The size of the felt, the placement, and the fact that the camera shouldn't have to be disassembled.
You see, the only reasonable place a "felt" would make sense, considering the origin of the light leak, would be the tiny space between the body and the image window, with the lens mount facing you (on the lens side). See:
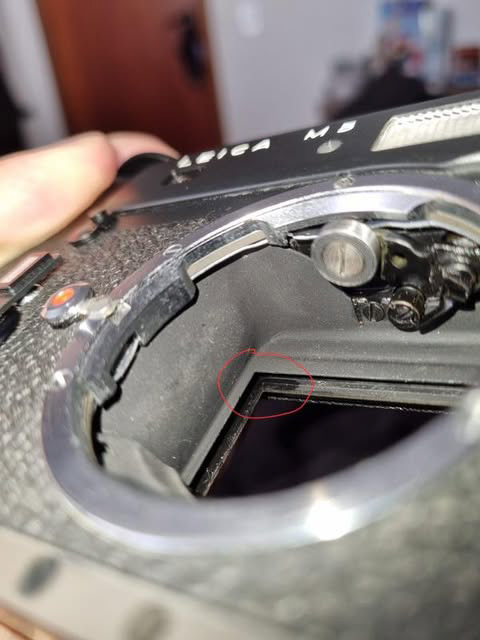
That's where the "felt" mentioned in the note should be glued. However, using that exact felt wouldn’t be a good idea today. Even if you could find the original material from the case, it’s probably too fragile to be attached inside the camera by now and could eventually decompose while in there.
The solution I came up with is as simple as it gets: gaffer tape. Gaffer tape is the perfect choice in this case since it blocks light, doesn’t decompose, and has its own adhesive—in other words, it's harmless and can be easily removed anytime.
To be attached properly, the tape needs to be exactly 1mm wide and 20mm long. With the camera locked in bulb mode (you can use a cable release for this), attach half of the tape (10mm/1cm) to the inside of the camera and the other half (10mm/1cm) to the opposite side. Use a wooden toothpick to ensure it is properly attached. This is what it should look like:
Once the tape is attached, its thickness effectively blocks light from entering through the small rangefinder window and reaching the negative. Because the angle is so specific, even this slight increase in thickness is enough to block the light.
In this updated fix, we used gaffer tape, which I’m confident has at least half the thickness of the original "felt" mentioned in the note. Because the felt was thicker (therefore "higher") it would probably block more light coming through the window, as the incidence angle would have been smaller on the frame.
Therefore, if you want, you can add one or two more layers of gaffer tape on top of the first one to increase its height and further reduce the light leak. I’ve used a single strip for a long time, and after more than 50 rolls of film, I’ve only seen the leak 4 or 5 times—but even then, they were nothing compared to the original ones.
You also don’t need to worry about the curtain eventually touching the tape—there’s plenty of spacethere. My M5 follows me around all the time, and the tape hasn’t moved ever since.
Click here to check out the detailed instructions.
I could finally use the camera without worrying about a ruined frame due to the leak. After I did it, I eventually posted on Reddit about finding the proper fix on a fellow user's post and, over time, people from all over the world started reaching out to me for help. They often get back to me stating that the method was working great.
It blows my mind to think that almost 50 years after the release of the infamous M5, people are still discovering and enjoying it to the point of going down this rabbit hole to solve the problem—just like I did.
I’ve wanted to make a formal post about this for a while to help others fix it, but I only just found the time. If you have any suggestions for improving the fix, please contact me so I can update the instructions. Also, let me know if this solution worked for you.
Enjoy!
IG: @autorefractor